


Adobe Screen Recorder – How to Record Screen with Adobe Premiere Pro and Adobe Captivate
Last Updated on October 21, 2025 by John Paul
When it comes to finding the best Adobe screen recorder, two popular names often come to mind — Adobe Premiere Pro and Adobe Captivate. Both are powerful tools, but they serve slightly different purposes depending on what you want to do. If you’ve ever tried to record your screen for a tutorial, demo, or creative project, you’ve probably wondered which one fits your needs better. Adobe Premiere Pro is known for its professional video editing capabilities, while Adobe Captivate is more focused on creating interactive e-learning content. Now, let’s find out how you can record your screen using them.

FYI: Can Adobe Premiere Pro and Adobe Captivate Record Your Screen?
While Adobe is such a reputable software brand, it doesn’t have a free, dedicated product that can record screens, let alone an app called “Adobe Screen Recorder”. There’s just no such thing yet. As for Adobe Premiere Pro and Adobe Captivate, only the latter has screen recording features. You can’t use Adobe Premiere Pro for recording screens; although it's a powerful video editing tool, it can only record audio at best.
In other words, only Adobe Captivate can be used as a screen recorder between the two. If you want to use it, just proceed to the next part for the steps.
How to Capture Screen with Adobe Screen Recorder (Adobe Captivate)
If you don’t have the program yet, you have to download Adobe Captivate first. Then, install it like any other app on your computer. However, you must know that unlocking its full features requires a full subscription at 33.90 USD per month, which can be costly long-term. After setting it up, you may follow the steps below:
1. Launch Adobe Captivate. Hit the File tab and choose New Project. There, select Blank Project
2. Next, set up the target recording area. Just hit the Record Screen option on the Start page. Alternatively, you can find it in the File tab > Record Screen. Choose between Full Screen or Custom Area.
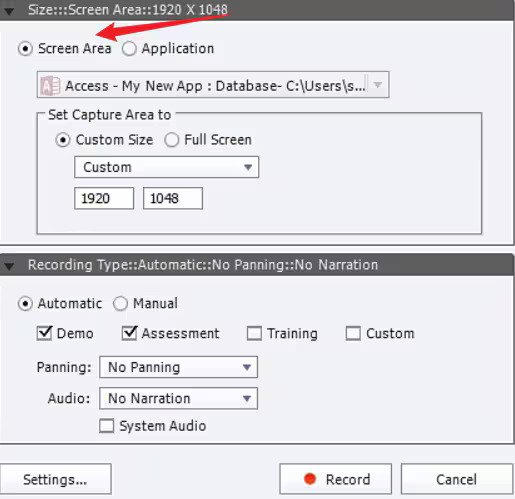
3. Choose your recording settings. You can set the Recording Mode, Audio Settings, and Recording quality. It’s up to your preferences how you’d like them.
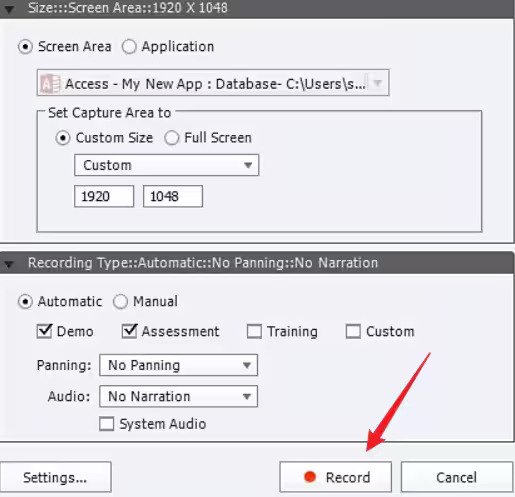
4. After adjusting your settings, click the Record button, and there should be a countdown on the screen. You can start your screen activities after the countdown. When you’re done, just hit the Stop Recording option in the toolbar.
5. You may review and edit the recording afterward. If you’re satisfied, just hit File and click Publish. There, choose the format you want and hit Publish again to save it to your desired location.
Method 1: Record Screen on Mac
Mac computers have a built-in screen recorder (QuickTime), especially macOS Mojave 10.14 and later. Here’s how to use it.
1. Once everything is ready, hit the Command + Shift + 5 keys at the same time. This will launch the Screenshot toolbar.

2. Then, choose your preferred recording option: Capture Entire Screen, Capture Selected Window, or Capture Selected Portion. If you’re recording a video with audio, you need to click Options > Microphone. There, select the source that you want.

3. When you’re finished choosing, click the Record button and do your thing. If you’re done, just hit the Stop button. That’s it.
Method 2: Capture Screen on Windows
If your computer is running on Windows 10 or 11, you’re in luck because it has a built-in screen recorder powered by Xbox Game Bar.
1. Ensure the app or screen you want to record is open. After that, hit Windows key + G keys to pull up the Xbox Game Bar.

2. Before recording, look for the Audio icon and activate the mic if you wish to include voice during recording. Just leave it off if you want to capture system sound.
3. After that, you start recording. Just click the camera icon or hit the Capture widget. Alternatively, you may use the Windows key + Alt + R.

4. If you’re done, click the stop button on the floating bar or use the same keys in the previous step. That’s it. The file is saved automatically to your computer’s storage.
Method 3: Record Screen with Widsmob Capture (Best Alternative)
If you're looking for a screen recorder that goes beyond the basics — something more powerful than Xbox Game Bar, more flexible than QuickTime, and way less complicated (and expensive) than Adobe Captivate — WindsMob Capture might be the best screen recorder for you. Whether you’re on a Mac or Windows, this all-in-one screen recorder delivers high-quality recordings (up to 8k) for everything from tutorials and gameplay to video calls and presentations, without making you jump through hoops.
Moreover, you can access different tools such as scheduled recording, real-time annotation, audio-only capture, webcam overlays, and even mouse effects that can make your recording even more exciting. You can also edit the recording afterward. You can trim, crop, merge, or even tweak audio right after recording, which saves you time and effort from switching between apps. It’s a game-changer for anyone who wants clean, polished screen recording without the headache.
Now, if you want to try Widsmob Capture, here are the steps to keep in mind:
1. Download the app and install it on your computer. Just click the button below to do so.
2. Then, open the app and choose the recording area you prefer: Full Screen, Custom Area, or Specific Window. If you want to use the webcam, just toggle on the Webcam switch. You may also set other settings like System Sound, Microphone, Format, Frame Rate, etc.

3. When ready, hit that big red REC button and a short countdown should start. After that, you may do whatever you like on the screen. You can use the floating toolbar during recording for capturing screenshots, pausing, etc.

4. Hit Stop when you’re done, and you can edit the video right after. Then, hit the Share or Save button to export the recording to your target folder location.

Comparing Screen Recording Methods
To see which one is the best for you, here is a brief comparison of the methods I’ve presented above.
| Feature | Adobe Captivate | Xbox Game Bar (Windows) | QuickTime (Mac) | Widsmob Capture |
| Video Quality | Excellent (Pro-level) | Good (Depends on system) | Good, but basic | Excellent (HD/4K support) |
| Audio Quality | High-quality with mic control | Decent (limited mic options) | Basic, mic-only | High-quality, with system + mic recording |
| Cost | Expensive (Subscription-based 33.90 USD per month) | Free (built into Windows) | Free (built into macOS) | One-time purchase (49.96) |
| Ease of Use | Steep learning curve | Super simple for basic use | Very easy, but limited | Very user-friendly interface |
| Editing Tools | Built-in editor (complex) | None | None (must use iMovie or others) | Built-in trimming and light editing |
| Custom Area Recording | Yes | No (app-only) | No (records full screen/window) | Yes (select any part of the screen) |
| Platforms Supported | Windows, macOS | Windows only | macOS only | Windows and macOS |
Final Thoughts
There’s no standalone “Adobe Screen Recorder,” but Adobe Captivate does offer screen recording as part of its larger (and more complicated) eLearning suite. For simple recording needs, built-in tools like Xbox Game Bar on Windows and QuickTime on Mac get the job done — but with limited features. If you want something more powerful and still easy to use, Widsmob Capture is the perfect choice for either Mac or Windows. It can deliver high-quality recordings at a reasonable price, compared to Adobe Captivate.