


Providing Solutions to Fix Bad Pool Header - Here are 3 Ways to Choose
Last Updated on September 20, 2025 by Yulia Ilina
When you are running on Windows 7/8/10/11 system, a blue screen suddenly appears, and BAD_POOL_HEADER appears below the blue screen, which indicates that the memory pool header of the system is corrupted, leading to various potential problems and crashes. This kind of error will lead to data loss and hardware damage if the bad pool header is not repaired in time. To quickly help you restore the normal operation of your computer, this article will provide you with a method to repair the bad pool header and help you restore files lost due to the bad pool header.

Part 1: What are the Reasons for the Bad Pool Header
A bad pool header is a Blue Screen of Death (BSOD) error in Microsoft Windows operating systems. It indicates a problem with the system's memory allocation or pool resources, specifically the memory pool that the operating system uses to manage memory allocation for different processes and components. There are many reasons for bad pool headers, including the following:
1. Faulty Device Drivers. Outdated or incompatible device drivers can sometimes lead to memory allocation issues, causing the BAD_POOL_HEADER error.
2. Software or Hardware Incompatibility. Certain software or hardware components might not be compatible with the system, leading to conflicts that trigger this error.
3. Corrupted System Files. If critical system files become corrupted, they can interfere with memory management and cause this error.
4. Disk-related Issues. Problems with disk storage, such as bad sectors or disk errors, can indirectly lead to memory allocation problems and result in this error.
5. Memory Issues. Problems with physical or virtual memory, such as faulty RAM modules or incorrect memory configurations, can also lead to this error.
6. Malware or Viruses. Malicious software can interfere with memory allocation and trigger this error.
Part 2: How to Fix Bad Pool Header on Windows
After a detailed understanding of the causes of the bad pool header, you can start to repair the bad pool header for different reasons.
Method 1: Uninstall Software or Hardware
When you installed the latest hardware or software drivers, the bad pool header began to appear. This incompatibility caused the computer to appear blue screen. Download recently installed hardware drivers and software, and you can also uninstall some antivirus programs directly. After the uninstallation is complete, the computer returns to normal and the bad pool header is successfully repaired, then you can use the above programs by downloading alternatives with similar functions.
Method 2: Disconnect the External Device.
External devices are easier to store some viruses, which will interfere with memory allocation and cause bad pool headers. Remove all devices on the computer except the keyboard and mouse, and see if the bad pool header disappears. If you want to confirm more carefully which device has the problem, you can eliminate it by connecting them one by one.
Method 3: Check RAM
Check if there is a problem with the RAM device, you can do it through safe mode. Safe Mode starts the computer in its most basic state with a limited set of files and drivers. When you start the safe mode, you can run and use it normally, you can rule out that the basic default settings of the computer and the device startup program will not cause the problem of a bad pool header. This can further narrow down the root cause of the problem and help solve the bad pool header situation.
Step 1: Click the Start button on the computer, select Setting in the pop-up page, and enter the basic setting page of Windows. Select System on the basic setting page, click the Recovery button in the next step, and enter the system recovery window.
Step 2: In this window, you can see a lot of options for the computer recovery system, click the Restart Now button next to Advanced Startup. Enter the Choose an Option page in the computer restart page, click the Troubleshoot button on the page, and enter the system key to summon the next function page.
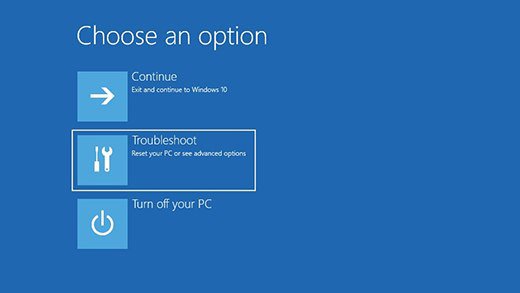
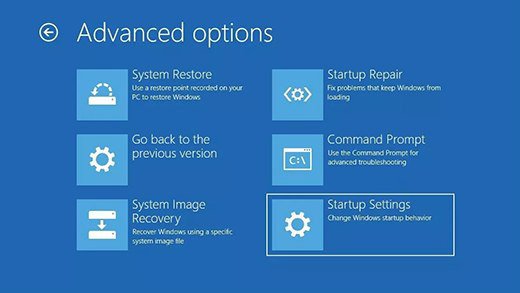
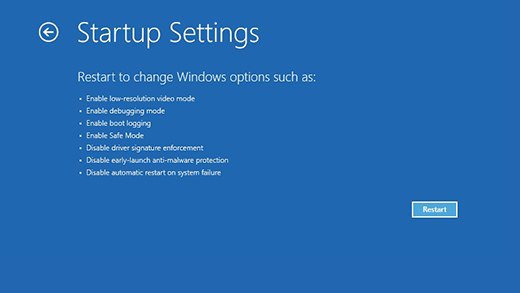
Step 3: In the Troubleshoot window, select Advanced Options to enter the next page. Click the Startup Settings button on the page, and click the Restart button on the page that appears. At this time, after the computer restarts, choose to start in safe mode on the page.

Part 3: How to Recover Files after Bad Pool Header Crash
If you go through the above methods, you should be able to run Windows normally, but when the bad pool header is damaged in Windows, the file will likely be lost. File loss in this situation cannot be easily recovered. At this time, you can use efficient data recovery software to recover files after a bad pool header. Aiseesoft Data Recovery is a data recovery software designed to help you recover lost, deleted, or inaccessible files from various data loss scenarios, including errors like "BAD_POOL_HEADER."
1. Retrieve a variety of data that might have been lost due to the error.
2. Provides a preview feature that sees the recoverable files before actually restoring them.
3. Utilizes advanced scanning algorithms, including deep scan technology.
4. Save time and space by avoiding the recovery of unnecessary files by selecting files
Step 1: Download and install Aiseesoft Data Recovery on your computer, and start it. In the main interface of the software, you can see the data types that can be recovered. Because it is necessary to restore all types of data, you need to click the Check All File Types button to select all data types.
Step 2: Select the corresponding partition in Hard Disk Drives according to the storage address of the lost file due to bad pool header damage. If the external hard disk is detected by other methods, then you can select it in Removable Drives. After the selection is complete, click the Scan button to start scanning the fixed partition.

Step 3: After the scan starts, the software will start to scan the selected drive, find recoverable files, and provide a recovery list. If you want more list of recoverable files, just click the Deep Scan button. Select the file, you can preview the file before recovery.

Step 4: Select the files to be recovered, or directly select all the files in the sidebar, click the Recover button, and recover all the files. After the recovery is complete, it will be saved in the original address, and you can check whether the file is successfully restored to the original storage address.

Conclusion
When you successfully repair the bad pool header error through the above methods, the computer starts to run normally and check whether the files on the computer are lost in time. If files are lost, you can use Aiseesoft Data Recovery to recover files lost due to a bad pool header. At the same time, in the future use of the computer, it is necessary to regularly maintain the software and hardware to prevent the bad pool header from appearing again.