


TRIM SSD Data Recovery - 2 Ways to Recover Deleted Data on TRIM Enabled SSD
Last Updated on September 20, 2025 by Yulia Ilina
The TRIM function is enabled on the Mac, which means that any data you delete will not be easily retrieved. However, because TRIM is enabled, the operating efficiency of the computer will be greatly improved, and many people will choose to enable it. Once any data is accidentally deleted, recovery becomes very difficult. But it is not impossible, this article will provide you with a detailed guide on TRIM SSD recovery.

Part 1: What is TRIM SSD
The routine data storage is to save the data on different partitions. The partition where the data is stored will be marked as not being able to store new data. If you delete the data, the data will not be deleted on the disk partition, but this partition will be marked as a storable area, waiting for new data to be overwritten. Such a method will make data rewriting slower. Many SSDs now support the TRIM function. After TRIM is enabled, MacOS will physically erase the data after the data is deleted, reducing the time for data rewriting. By enabling TRIM SSD, your Mac will perform better and run smoother.
Part 2: How to Check If TRIM Enabled
If you don't know whether the TRIM function is enabled, you can check it by the following method.
Step 1: Click the Apple icon on the Mac desktop, select About This Mac in the options that appear, and open the corresponding page. On the page, you can see relevant information about this computer. Click the System Report button to view information about your Mac.
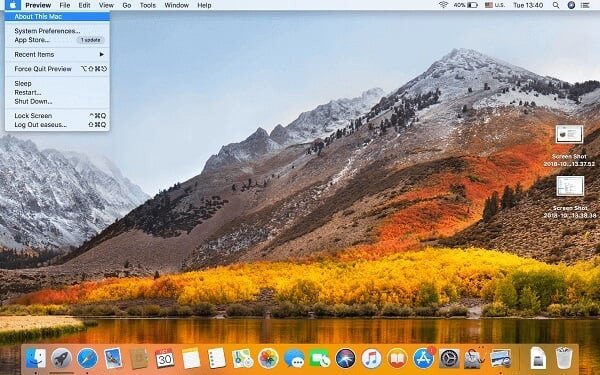

Step 2: In the system report window, you can see all the information about the device. Select Hardware in the left sidebar, then go to SATA/SATA Express, and the details will appear on the right. Find TRIM Support in it, if it is followed by Yes, then it proves that TRIM is enabled.

Part 3: How to Recover Data from a TRIM-Enabled SSD
Method 1: Time Machine
Time Machine is the most commonly used backup function on the Mac. It can automatically back up the files in the SSD according to the SSD you have set up, in case of emergency. If you use the backup feature on a TRIM-enabled SSD, you can restore the data directly in Time Machine.
Step 1: On Mac, enter the Unity program under Recovery Mode by using the Command+R shortcut key, and click the Restore from Time Machine button to enter the Time Machine page. Or click the Apple icon on the top of the page to select System preference, and in the shortcut menu that appears, you can also directly enter the Time Machine page.

Step 2: Click the Continue button on the page to officially enter the data recovery page. Select the TRIM SSD on the page, check the time of the latest backup, and select it. After the selection is successful, click the Restore button to restore the backup data and restore the data in the TRIM SSD.

Method 2: Data Recovery Software
With TRIM-enabled SSDs, data is rewritten very quickly, but it also means that data has been deleted before being overwritten, and the possibility of recovery is very small. Time Machine can perform TRIM SSD recovery on Mac only when backup is enabled. If you do not have backup data, you need to rely on Aiseesoft Data Recovery, a professional data recovery software, to perform data recovery with TRIM SSD enabled. Aiseesoft Data Recovery, as a data recovery software that can provide relevant data recovery options by deeply scanning TRIM SSD, can help you to the greatest extent.
1. Allows you to recover many types of files such as video, audio, images, and documents.
2. Recover data from the internal hard drive, external hard drive and recycle bin.
3. Automatically generate the main interface according to the storage space of the computer.
4. Provide Quick Scan and Deep Scan functions to obtain more recoverable files.
Step 1: Install Aiseesoft Data Recovery on the computer. After the installation is complete, start the software, and you may be able to see that the page consists of three parts, which are recoverable file types, Hard Disk Drives, and Removable Drives. Select the hard disk with the TRIM function enabled in Hard Disk Drives, so that the software starts a targeted scan for it.

Step 2: Many types of data can be recovered, including video, audio, images, documents, and so on. For comprehensive detection of all file types, you can click the Check All File Types button. After the selection is complete, click the Scan button to start scanning the software and provide a recoverable list.

Step 3: Quick Scan can only provide part of the recoverable files, a richer recoverable list is needed, and you need to click the Deep Scan button to perform a deep scan. After the scan is complete, select the files to be recovered and preview them. After confirming that they are correct, click the Recover button to restore the files in the TRIM SSD to the original storage location.

Conclusion
Through the above methods, you can restore all your desired data in TRIM SSD very quickly. But because the data is physically erased, the faster the recovery, the better, otherwise, as time goes by, the success rate of file recovery will become smaller and smaller. Aiseesoft Data Recovery is a very good data recovery software, it can still provide you with a TRIM SSD recovery option even if the data is not backed up.