


How To Stream On Twitch With OBS
Last Updated on October 21, 2025 by Rhea Cabalida
Twitch is one of the largest live-streaming platforms in the world, with over 240 million users worldwide. It is a place where the most famous streamers and creators broadcast their games, reactions, and interviews.
The platform is not just a place to watch famous streamers; it is also a bridge to help you reach and share your content with a larger audience. To do so, so will need a tool that can broadcast your Twitch streams; we know just the tool for that.
OBS Studio is a live-streaming/screen recorder tool; it is the go-to program for all seasoned and aspiring streamers. It has a lot of great features to enhance your live streams and more!
So to know more about how to stream on Twitch with OBS, stay tuned! In this page, we have explained the step-by-step process on how to do a live stream on Twitch with OBS, as well as tips and more! Read on!

In this Article:
What Is OBS & Why Use It for Twitch Streaming?
OBS Studio (Open Broadcaster Software) is one of the few free, open-source applications designed for live streaming and screen recording. It offers free access to tons of features that can be used for multiple purposes.
This is why Twitch streamers widely use it because it offers professional-level controls without the need for paid software.
Here are the things that most Twitch users love about OBS:
✅ 100% free and open-source
✅ Multi-platform: Windows, macOS, Linux
✅ Supports HD and 4K streaming
✅ Customizable with plugins, filters, and overlays
✅ Lightweight and optimized for most systems
To sum it up, OBS has all the things you need to broadcast your Twitch streams smoothly. So it’s really a must-try.
💡 To know more about OBS, read this guide: OBS Studio Review & Guide
Things You Need Before Streaming on Twitch with OBS
Okay, if it's your first time using OBS and Twitch together to stream, then here are the things you need before we begin.
1. Twitch Account
If you still don’t have it, create your Twitch account here.
2. OBS Studio
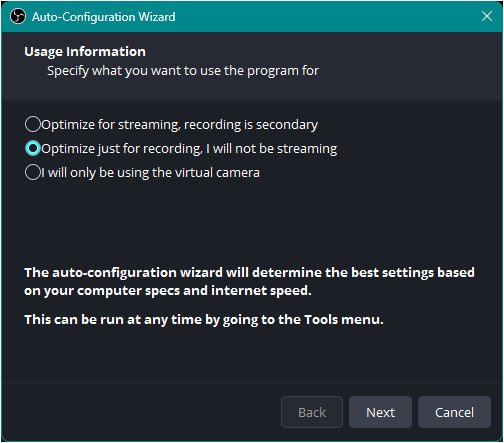
Visit the OBS Studio official site and download the program onto your computer. In the Auto-Configuration Wizard, choose the best settings for streaming.
3. Hardware & Internet Requirements
Streaming is a heavy task for a computer, and to do it successfully, you need to have enough resources, a.k.a., high enough computer specs. If your computer setup does not comply with the recommended specs, you might experience issues while streaming.
To stream on Twitch with OBS, your computer should have:
✅ CPU: Intel i5 / Ryzen 5 or higher
✅ RAM: 8 GB minimum
✅ GPU: NVIDIA GTX 10 series or equivalent
✅ Internet upload speed: 5–10 Mbps (for 1080p 60–120 FPS)
4. Optional Tools
To enhance your broadcast and to be able to interact with your audience, you will need:
✅ Microphone
✅ Webcam
✅ Dual monitor (this makes reading the comments and managing the scenes easier)
Step 1: Connect Twitch Account to OBS
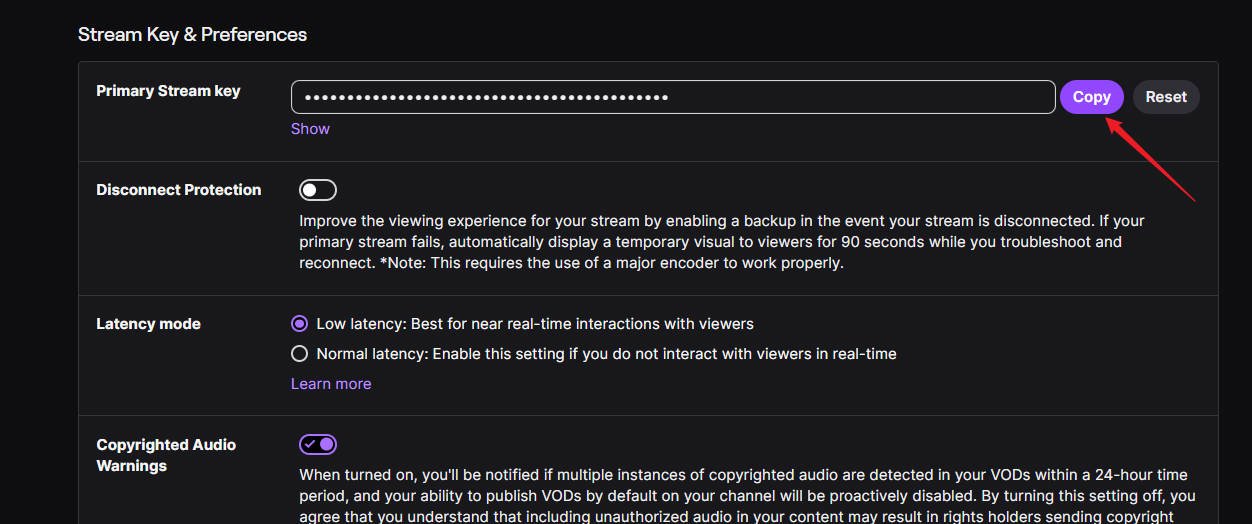
On your Twitch account, click the Profile icon > Settings > Stream > then copy the Stream Key.
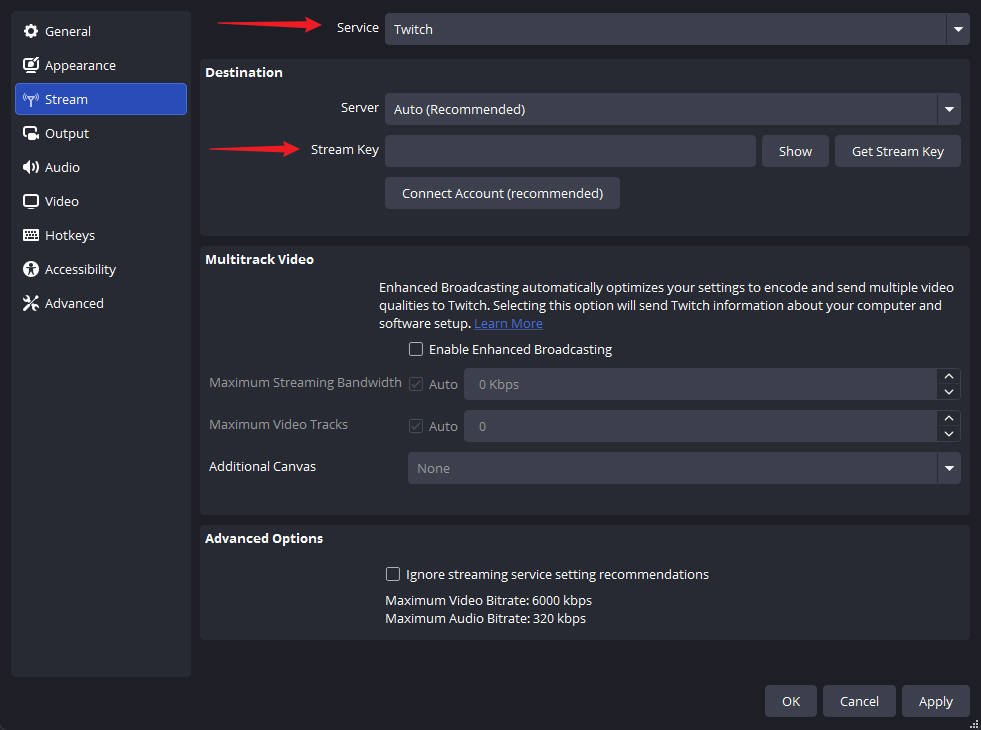
Open OBS, go to Settings > Stream > then choose Twitch as the service> paste the Stream Key in the box, then press OK.
💡 Tip: Don’t share your stream key with anyone. People who have access to it can stream on your channel.
Step 2: Set Up Scenes & Sources
This part will depend on your preferred stream setup.
Tick the Plus icon (+) in the Scenes tab, and set a scene.

Next, add your Sources. This is where you select the things that will show up on the screen during your broadcast: screen, game window, camera, and microphone.

➡️ Game Capture: Captures your game window.
➡️ Display Capture: Records your whole screen.
➡️ Video Capture Device: Adds your webcam.
➡️ Audio Input Capture: Connects your microphone.
Once everything is selected, you can adjust the positioning/layering based on your preferences.
Step 3: Configure OBS Streaming Settings
Set the OBS settings for 120 fps streaming on Twitch to ensure that the resolution will be clear and crisp. Here are the other configurations that you should set:
➡️ Encoder: NVIDIA NVENC (new) or x264
➡️ Bitrate: 8,000 - 10,000 kbps
➡️ Resolution: 1920×1080
➡️ Frame Rate: 120 FPS
➡️ Keyframe Interval: 2
➡️ Preset: Quality or Max Quality
➡️ Profile: High
You can access these by going to Settings > Video or Output. These are just our recommended settings; you can adjust them based on your preference and computer capability.

Step 4: Go Live
On OBS, tick Start Streaming, then check your Twitch Dashboard to confirm your stream is live.

Tip: How to Add Twitch Chat to OBS
We see most streamers interact with their audience through the live chat while they are gaming or doing a bunch of stuff during their stream. If you want to apply it to your lice stream, here’s what you have to do:
Step 1:
Go to your Twitch channel’s chat window, click the cog icon > Popout Chat.
Step 2:
Copy the URL, then go to OBS > Sources > Plus (+) icon > Browser > Add New > OK.

Step 3:
Paste the URL in the box, then adjust the width and height (e.g., 400x600). This will be the size of the comments box on your stream.
Step 4:
From there, customize the font, background color, and transparency. Click OK to apply the changes.
After this, you can now interact with your audience without having to close/open windows. It's like you're a pro streamer!
❌ Issue: Dropped frames/ laggy/poor video quality
⚠️ Reason: Weak internet connection
✅ Fix: Lower the bitrate or FPS
❌ Issue: Stream not connecting
⚠️ Reason: Wrong stream key
✅ Fix: Double-check check stream key or use the Connect Account button
❌ Issue: No sound
⚠️ Reason: Issues with the audio source
✅ Fix: Check audio mixer settings or see if the audio source is connected properly
❌ Issue: OBS crash
⚠️ Reason: CPU overload
✅ Fix: Remove some of the sources or use the NVENC encoder. Check for the NVENC guide
Bonus: Record Gameplay or Twitch Stream
Aside from live streaming your gameplay, another way to share your content with people is by recording the whole game or some parts of the game, then uploading the clips on social media. You can also record the whole live stream so you can trim the footage later to save the highlights.
By doing this, you can have a backup of your live and gameplays, and further increase your views by sharing the clips on social media, which can attract more followers.
To be able to do these things, you will need a reliable screen recorder to capture everything that’s happening on your screen. Luckily, we have a program in mind.
Introducing Aiseesoft Screen Recorder, one of the most trusted screen recorder tools in the market today! It is a lightweight tool recommended for capturing gameplays, livestreams webcam sessions in HD or 4K. How cool is that?

With Aiseesoft, you can:
➡️ Capture streams/gameplay without lag or performance issues
➡️ Record the microphone and internal audio
➡️ Save recordings in various formats: MP4, MOV, WMV, or AVI
➡️ Edit clips before saving
This is the perfect tool for content creators and streamers as it has everything you’ll ever need! Try it out now!
Author’s Note
The process of using OBS to stream on Twitch may be intimidating at first, but once you’ve understood everything and started the process, you’ll realize that it's not that hard at all. With the right setup and some presence of mind, sharing your streams with your audience will just be a piece of cake.
And if you want to save your gameplay or stream highlights, don’t forget to try Aiseesoft Screen Recorder, a simple yet powerful way to keep your content safe and shareable.