


OBS Screen Recorder: How to Record Your Screen Like a Pro
Last Updated on October 23, 2025 by Rhea Cabalida
OBS, or Open Broadcaster Software, also known as OBS Studio, is one of the most popular screen recorder tools. It is used to create tutorials, capture gameplay, and even for live streams on YouTube or Twitch. It became one of the go-to recording tools due to its powerful features and free service.
If you’re looking for a good recorder tool and are considering OBS, then stay tuned. This article will cover everything you need to know about OBS Studio, including how to use it and some alternatives worth considering. Read on!

In this Article:
What is OBS Studio?
OBS is a free, open-source software available on Windows, Mac, and Linux. Unlike similar programs, OBS screen recorder or OBS Studio is an all-in-one tool that allows screen recording and live streaming. This program works on multiple sources, like webcams, images, audio inputs, and display capture, into one recording or stream.
It basically got all the things that a streamer, gamer, content creator, educator, and professional need when creating digital content.
OBS Screen Recording Features
One of the things that makes OBS one of the top choices in terms of screen recording is its amazing features. Here’s the list of its key functions.
High-Quality Recording
Quality is one of the things we consider when recording or streaming; the good thing OBS screen recording can produce professional-grade output, thanks to its high resolution support: HD, 2K, and 4K. It also allows users to adjust their preferred resolution and frame rate from 30 fps to 120 fps (depending on whether your equipment supports it).
Aside from that, screen recording with OBS also allows you to use multiple video encoders, such as x264, NVENC, AMD, and Intel Quick Sync. This will give you more flexibility in terms of the quality and performance of your output.
Scene & Source Management
One of OBS’s unique features is its scene-based workflow. Instead of just recording your screen, you can:
➡️ Set up different scenes for various tasks, such as recording screen gameplay with a webcam overlay, and more.
➡️ Record multiple inputs like webcam, microphone, gameplay window, and background image, and combine them into one recording.
➡️ Use hotkeys as shortcuts to switch between different scene setups.
This feature is favorable to streamers and live creators as it gives them creative control and makes their recording look polished and professional.
Audio Mixer
Aside from superb video quality, the audio quality of our recordings has the same level of importance. Which is why if you screen record with OBS, you will get to access its professional-grade audio tools:
✅ Noise Suppression: This feature controls the surrounding sound of your environment, such as fans, typing, and traffic, and aims to deliver a clean audio signal to your recordings or broadcast.
✅ Volume Control: Users can adjust the volume of both the microphone and desktop audio to lower or boost it.
✅ Filters & Effects: This allows adding audio compression, adjusting the EQ, noise gates, and more. All these effects will produce studio-like outputs.
✅ Multiple Input Support: Just like the video features, OBS’s audio also records multiple outputs at the same time: microphone, system sound, etc.
Streaming Support
As mentioned, OBS is not just a screen recorder; it can also be used for professional streaming. It can directly work with popular platforms such as:
✅ Twitch
✅ YouTube Live
✅ Facebook Live
✅ Custom RTMP Servers
With OBS, you can record and stream at the same time, giving you flexibility to both create content and interact with audiences live.
Cross-Platform Support
There are screen recorders available on the web that are restricted to one operating system. Well, that list doesn't include OBS screen recorder, as it works on:
✅ Windows (all modern versions)
✅ macOS (Apple Silicon & Intel support)
✅ Linux (Ubuntu, Fedora, Arch, etc.)
Plugin Support
OBS’s built-in features are indeed amazing, but it doesn't stop there. As mentioned, it is open-source, and the program has strong plugin support developed by its community. These plugins extend the program's capability beyond its standard features.
➡️ StreamFX: For adding advanced effects like blur, 3D transformations, and color grading.
➡️ OBS-VirtualCam: Turns OBS into a virtual webcam for Zoom, Skype, or Google Meet.
➡️ NDI Plugin: Enables broadcasting and capturing across different devices on the same network.
➡️ Replay Buffer Plugins: Instantly capture highlights while gaming.
This ecosystem makes OBS endlessly customizable, letting professionals tailor the software for their exact workflow.
Pros:
✔️ Free and open-source
✔️ Works for both screen recording and streaming
✔️ Professional-level features
✔️ Additional plugins
✔️ Active community and support
Cons:
❌ Steep learning curve for beginners
❌ Requires high computer specs
❌ The interface can be overwhelming at first
OBS’s effectiveness will depend on how the user intends to use it and their capabilities. We all have different goals when using tools like this, so some features may be suited for others, and some are not. But that will not justify the capability of the program.
How to Download & Install OBS Studio
Step 1:
Go to the official OBS Project website and download the version suited to your operating system.
Step 2:
Install the program; follow all the steps provided on your screen.
Step 3:
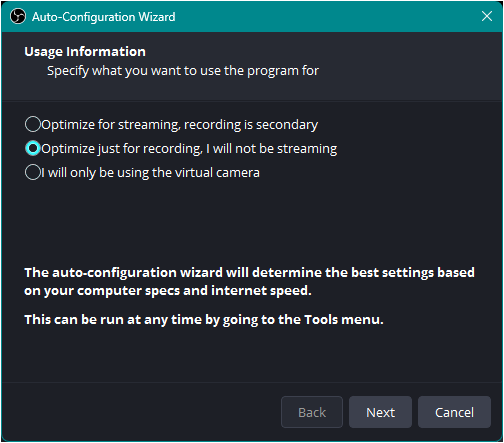
Run the Auto-Configuration Wizard to optimize settings for recording or streaming.
How to Record Screen with OBS
Step 1:
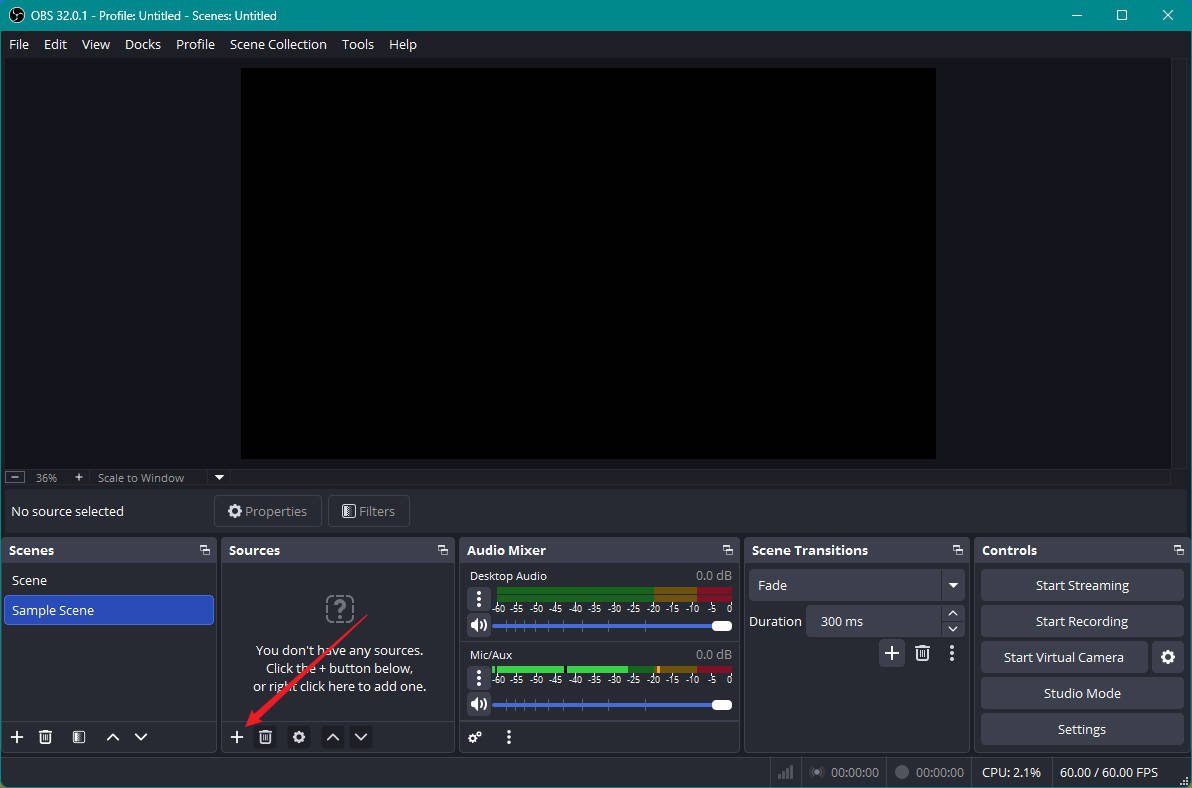
Launch OBS Studio. In the Scenes tab, click the Plus (+) icon to start a new scene. Set a title/name, then press OK.

Step 2:
In the Sources tab, click the Plus (+) icon and choose your screen recording preference:
- Display Capture to record your whole screen
- Window Capture to record a specific app
- Game Capture for gameplay

Step 3:
Then, select your Capture Method and Display (if you have multiple screens).

Step 4:
Add your microphone and desktop audio sources, then click Properties to choose a specific source.

Step 5:
Press Start Recording to begin, and Stop Recording when you’re done. The file will be saved in your default Video folder.

Adjust Recording Settings for Best Quality
Here are the quality settings we recommend to achieve a clear video resolution.
➡️ Resolution: Set it to 1920x1080 (1080p) for standard content. This provides a decent video quality with an average file size. But you can go higher (2K to 4K) if your computer can handle it.
➡️ Frame Rate: 60 fps is recommended for gaming and heavy-motion content. If it's a standard video recording project, 30 fps will be enough.
➡️ Bitrate: Increase bitrate for sharper video (e.g., 6000 kbps for 1080p60). Just note that higher bitrates create larger files.
➡️ Recording Format: By default, OBS sets the output format as Hybrid MP4. This format is developed by OBS and is a mix of MP4 and MKV. It has high compatibility, just like MP4, and the data recovery benefits of the MKV container.
This allows the recorded video to be saved without getting corrupted in case an error or a power issue occurs. We suggest sticking with this format, unless your project requires specific formats. You can change the format by going to: File > Settings > Output > Recording format.

For more information about OBS’s formats, check this guide.
Use Hotkeys for Efficiency
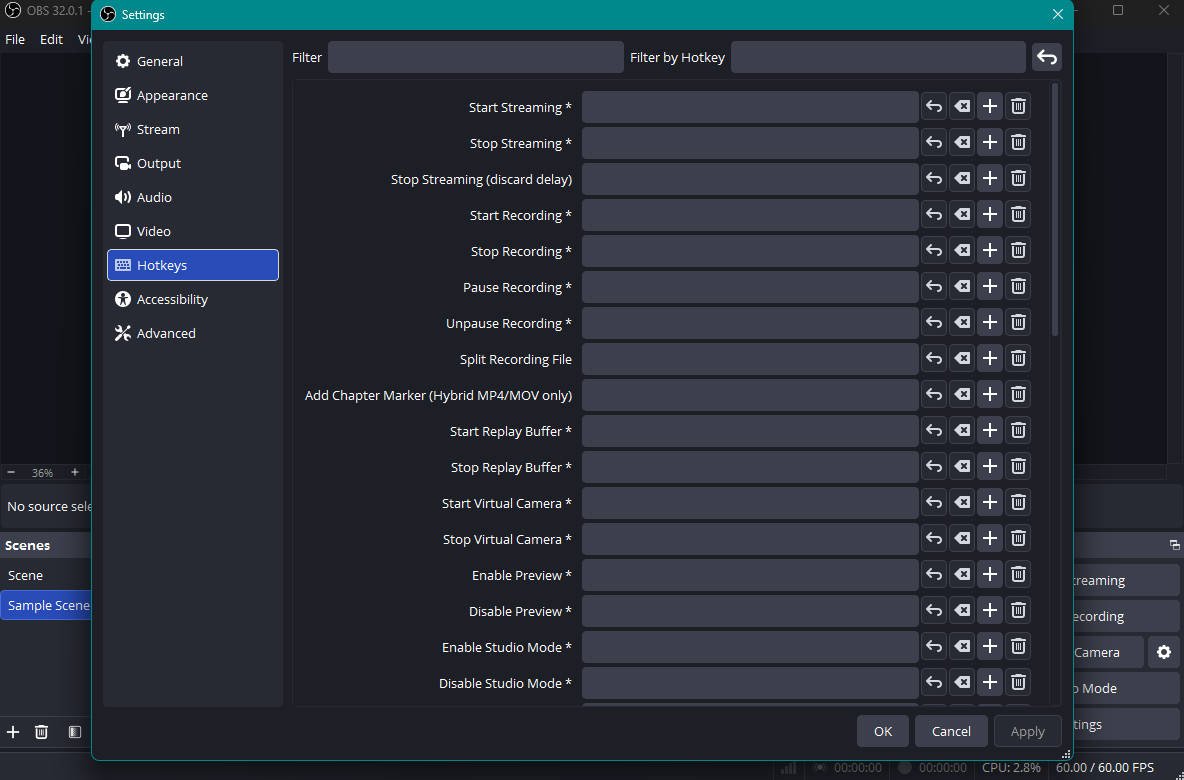
Set up custom hotkeys to control the features easily. Instead of manually starting and stopping recordings, you can use hotkeys instead.
For example:
F2 for Start/Stop Recording
F3 for Pause/Resume Recording
F4 for Switch Scenes
This will help you become more efficient and improve your workflow. To set up hotkeys, go to File > Settings > Hotkeys > to save changes, press Apply, then OK.
Optimize Audio Settings
To achieve a clear and crisp audio when screen recording with OBS, follow these tips:
✅ Use a dedicated microphone for clear voice recording. Yes, some cameras may have built-in mics, but most of them won’t clearly capture your voice. Having a good microphone will help with that.
✅ Adjust the microphone gain so your voice is loud and clear but not distorted.
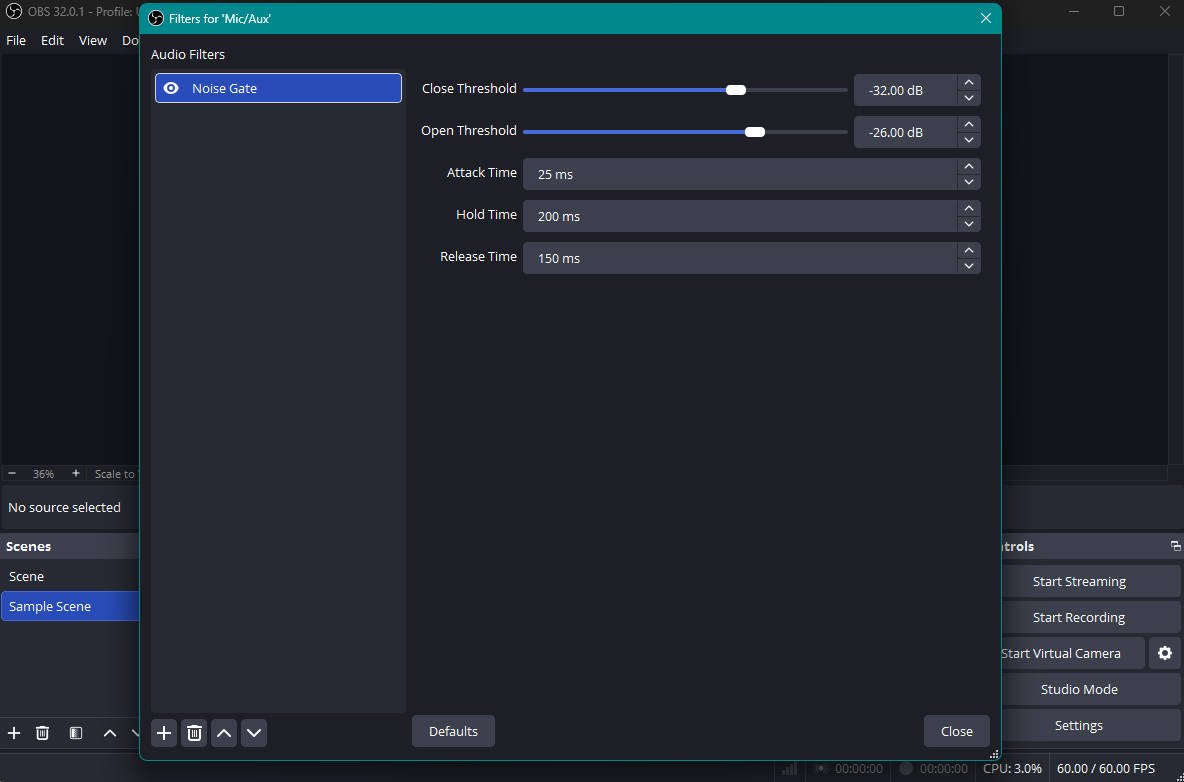
✅ Enable the noise suppression and noise gate filters to eliminate the background. Enable these filters, go to the Audio Mixer tab > Mic/Aux > three-line icon > Filters > Plus (+) icon > Noise Gate. After that, set your preferred parameters.
✅ Monitor audio levels in the OBS mixer (aim for -6 dB to -3 dB for voices).
These are just some of the enhancements you can do in OBS. The program has tons of features you can tweak to achieve the output you desire.
WidsMob Screen Recorder
WidsMob Screen Recorder is one of the hottest screen recorders today. It is designed to help users capture their screens and audio without hassle. It has an accessible interface with a bunch of handy features, and it works on both Windows and macOS.
If you’re looking for a tool for standard audio and screen recording, and if you’re a beginner, we highly recommend this one.

Key Features
➡️ Record full screen, custom region, and locked windows.
➡️ Captures both mic and system audio. An audio test feature is also included to check the sound before recording.
➡️ Supports HD, 4K, and 8K recording and hardware/GPU acceleration to reduce lag.
➡️ Has video editing tools that help enhance your output: trim, add text/arrow/shape, cut, crop, merge, etc.
➡️ Wide format support for image, audio, and video.
Pros:
✔️ Easier learning curve
✔️ Built-in editing tools
✔️ Easy to operate and guided interface
Cons:
❌ Paid & licensed software (not free)
❌ No plug-ins and a less customizable system
❌ Not as flexible and doesn't have advanced features
Camtasia (by TechSmith)
Camtasia has been around for a while and has proven that it's one of the best when it comes to screen recording. It's a combination of screen recording and video editing tools, which makes it perfect for users who want to achieve polished outputs without exerting a lot of effort.
It often bumps shoulders with OBS, as both have a lot of similar features. Nevertheless, both have their unique edge, which is the reason for their continued popularity.

💡 Read here to know more: TechSmith Camtasia – Best Screen Recorder to Capture Onscreen Activities with Ease
Key Features
➡️ Records screen, webcam, system audio, and microphone.
➡️ Built-in video editor, includes the basic editing tools, plus transitions, pan effects, adding callouts, etc.
➡️ Offers templates for different kinds of videos, such as tutorials, and more.
➡️ Supports exporting in different resolutions and formats.
Pros:
✔️ Offers more advanced editing features
✔️ Good support and is frequently updated
Cons:
❌ Expensive compared to WidsMob
❌ Errors may potentially occur when working on heavy projects
Best Used by/for:
➡️ Users who prefer built-in editing tools, which maximize the tool usage and provide an efficient workflow.
OBS Studio vs. WidsMob vs. Camtasia
Here is a closer comparison of OBS to its alternatives: WidsMob Screen Recorder and Camtasia.
| Feature | OBS Studio | WidsMob Screen Recorder | Camtasia |
|---|---|---|---|
| Price | Free | $31.20/month or $55.96/lifetime | $299.99 one-time |
| Ease of Use | Moderate to Hard | Easy | Easy to Moderate |
| Max. Recording Quality | 4K | 4k to 8K | 4K |
| Editing Tools | None | Basic tools | Professional tools |
| Streaming Support | Yes | No | No |
| Audio Features | Advanced mixer, filters | System & microphone audio capture | Multi-track audio editing |
Authors Advice
OBS and the two alternatives, WidsMob Screen Recorder and Camtasia, are three of the most recommended tools for screen recording.
Although one may be superior to the others in some areas, there is no doubt that these programs are made to help content creators, students, and professionals achieve the best of the best.
So whether you’re a beginner or a seasoned creator, there’s always a tool that will suit you.