


Easy Ways to Save & Record Twitch Streams
Twitch is one of the biggest and most popular online streaming platforms in the world. It's a place where content creators, gamers, and musicians, do live streams and share them with their audiences. It's also a great platform to start an online career and show off your talents and charms.
Now, whether you’re a streamer who wants to keep your broadcasts or a viewer who wants to save a favorite stream, recording Twitch content is the best solution.
In this article, we will show you the quickest way to record Twitch streams, the restrictions you should know about, and some pro tips to get smooth, high-quality recordings. Read on!

In this Article:
Is it Allowed to Record Twitch Streams?
Yes, but that depends on whose stream you want to record.
➡️ If you want to save streams on Twitch on your own channel, the platform automatically saves your broadcast via the VOD (Video on Demand) feature.
➡️ If you’re a viewer and wish to save/record Twitch streams by other creators, you will need a third-party screen recorder.
In the following parts, we will discuss how to save streams on Twitch using VOD, as well as the best tools to record them.
⚠️ According to Twitch’s Terms of Service, downloading and distributing others’ content without permission is prohibited. If you want to record the streams, it should be for personal use, or if you have proper authorization from the creators.
Save Streams on Twitch via VOD
If you’re new to Twitch or it's your first encounter with VOD, this feature stands for Video on Demand. It automatically saves streams on Twitch so you and your viewers can rewatch them. In short, it's like a replay function.
Once enabled, your live streams will be saved on your Twitch channel. From there, you can manage the clip or download the stream. However, Twitch will not keep the streams on your channel forever. They are only there for a limited time, and the length will depend on your account type.
➡️ For regular streamers: 7 days
➡️ For Twitch partners, Turbo, and Prime members: 60 days
After the allotted time frame, the streams saved by VOD will be deleted.
To turn on VOD on your Twitch account:
Step 1:
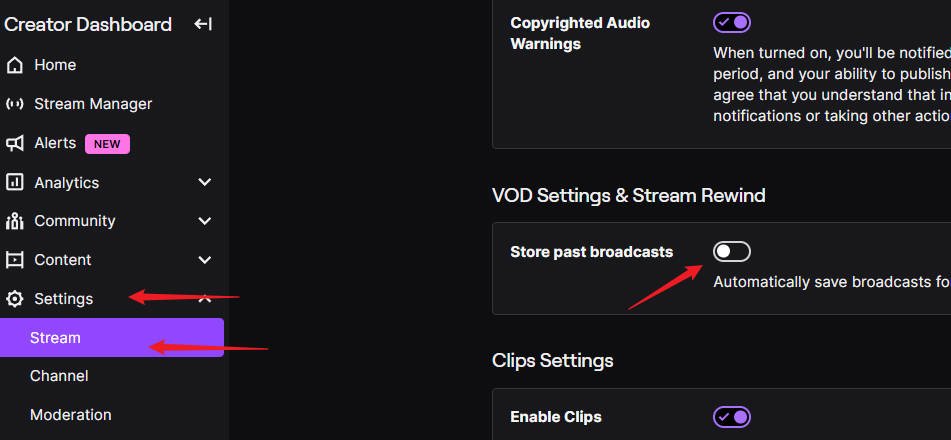
Go to the Creator Dashboard, open Settings > Stream.
Step 2:
On the Settings & Stream Rewind tab, turn on the switch on the Store past broadcasts option.
After this, once your live stream ends, they will automatically be saved and appear on the Video Producer tab. From there, you can:
✅ Download the stream to your computer.
✅ Edit or create highlight clips
✅ Manage or delete
After 7 or 60 days, the saved live stream will be deleted.
Save Twitch Live Stream via OBS Studio
When you do a stream live on Twitch, you may need programs like OBS. This tool offers numerous customization features that will enhance your broadcast. Aside from that, it also has a screen recorder feature that can capture the broadcast in real-time.
Unlike VOD that saves the stream after it's done, OBS will record your live stream while it's ongoing. This means that you’ll have a copy of the stream right after it's done.
To record Twitch streams with OBS, here's what you have to do:
Step 1:
Download and install OBS.
Step 2:
Go to Settings > Output > Recording.
Step 3:
From there, set your preferred recording specifications.

Step 4:
Next, press Start Recording as soon as the live stream starts. Then turn it off once it's done.
💡 For the full guide on how to stream on Twitch with OBS, check out this guide: The Complete Guide on How to Stream on Twitch via OBS Studio
Record a Twitch Live Stream via Aiseesoft Screen Recorder
When it comes to screen recording, Aiseesoft Screen Recorder is one of the tools to try. It is built to seamlessly record screen activities, live streams, and even movies. It’s a professional yet user-friendly tool that captures both video and audio in high quality.

It's also a streamer-friendly tool as it allows you to schedule recordings, capture multiple audio sources, and record specific windows. Aiseesoft is lightweight and has a user-friendly interface, plus it can capture streams or gameplays up to 60fps and supports multiple output formats.
Aside from that, Aiseesoft still has a bunch of features, so don’t miss out and try it now!
How to Record Streams on Twitch
Step 1:
Download and install Aiseesoft by clicking the button below.
Step 2:
Once installed, load the stream you want to record.
Step 3:
On Aiseesoft, turn on the System Sound option to record the audio of the stream.

Step 4:
Next, press Start, then open the window containing the live stream. Once you’re done recording, simply press Stop.
If you’re recording long live streams, don’t worry, Aiseesoft automatically saves videos in small file sizes without losing clarity.
Record a Twitch Stream via Chrome Extension Recorders
If you’re not a fan of installing apps on your computer, then consider using Chrome extension recorders. These tools will directly record streams on Twitch once it's enabled. Chrome extension recorders are ideal for recording short clips or for casual use.
Here are some of the most popular tools:
⬇️ Screencastify: Great for beginners
⬇️ Loom: Support video and audio recording, includes editing tools
⬇️ Cursorful: Offers flexible recording options with zoom features.
These Chrome extension recorders will directly save the recorder clips to your computer's storage; in this case, it will be easier to share.
Final Thoughts
Recording Twitch streams is fun, but we need to remember that respect towards others and their work should come first. Before recording, here are things to keep in mind:
✅ You can always record your own streams freely.
✅ You can record others’ streams only for personal use.
✅ Don’t repost or monetize someone else’s content without consent.
✅ Avoid recording subscriber-only or private broadcasts.
Just remember this saying “Don't do to others what you don't want others to do unto you”. If you don’t want other people using or gaining from your content, you shouldn't do it to them either.