


How to Start and Stop Screen Recording on Mac
Last Updated on November 13, 2025 by Rhea Cabalida
Being able to screen record on our Mac is a lifesaver, especially if you’re a streamer or online creator who wants to share gameplay and create tutorials. A screen recording tool will help capture your screen and turn it into an uploadable output.
Thankfully, Mac has now included some built-in screen recorders and supports third-party tools to help users with their projects. If you’re new to the macOS environment and want to learn how to start screen recording on Mac and how to stop it, then this is the place for you.
In this guide, you’ll learn how to start and stop screen recording on Mac, understand the limitations of the built-in recorder, and discover a better alternative that offers more flexibility and professional features.

In this Article:
Method 1: Start Screen Recording on Mac via Screenshot Toolbar
For macOS Mojave users, you can start screen recording via the Screenshot Toolbar. It can capture screen images and clips at the same time.
Step 1:
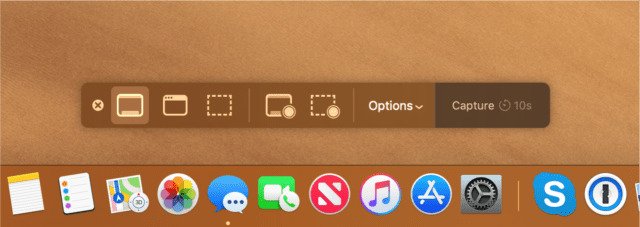
On your keyboard, press Shift + Command + 5. You will then see a small floating tab at the bottom of your screen where you’ll see the recording functions.
Step 2:
Choose between Record Entire Screen or Record Selected Portion to record the full screen or a specific area.
Step 3:
Open the Options menu and configure the output settings. You can also turn on the mic recording if you want to include audio on your clip.
Step 4:
Once it's all set, press Record to start screen recording on Mac. You’ll see a 5-second countdown before it officially starts.
Method 2: Start Screen Recording on Mac via QuickTime Player
For Macs running on macOS High Sierra or an earlier version, you can use QuickTime to capture screen videos.
Step 1:
Go to Applications and open QuickTime Player.
Step 2:
Press File, then select New Screen Recording.

Step 3:
On the floating window, tick the arrow beside the red button to set the audio specifications.

Step 4:
To start screen recording on Mac, simply press the Record button.
Stop Screen Recording on Mac via Screenshot Toolbar
Step 1:
On your screen, look for the recording icon on the floating menu bar; it should be in the top-right corner of the screen.
Step 2:
Press Stop, and a thumbnail preview of the clip will be shown in the bottom-right corner.
Step 3:
You can click on the thumbnail to view or edit the clip. You can also just ignore it, and the recording will be saved automatically.
Stop Screen Recording on Mac via QuickTime
Step 1:
Hit the Stop button in the menu bar or press Command + Control + Esc, and the recording will automatically end. You will also see a preview window showing your captured video.
Step 2:
To save the recording, go to File > Save, then choose a destination folder and click Save.
💡 Note: Screen recordings in QuickTime will be saved as MOV files, which are high-quality but can be large.
How to Stop Recording if an Error Occurs
If you unexpectedly experience an error while screen recording using the Screenshot Toolbar or QuickTime, here’s what you can do to force stop the recording.
Step 1:
Press Command + Option + Esc to open the Force Quit window.
Step 2:
Choose QuickTime Player or Screenshot and click Force Quit.
Step 3:
Alternatively, you can also directly close the screen recording tab to stop the recording automatically.
Limitations of the Built-in Screen Recorder on Mac
While the pre-installed programs offer great perks for screen recording, it's still not enough to create professional-grade content, due to their limitations, which include:
❌ Limited audio options
❌ No webcam overlay
❌ Only supports MOV format
❌ Few customization options
❌ Lags and errors
If you only need quick recordings, macOS’s built-in screen recorder is fine. But if you want to create high-quality recordings, we highly suggest using third-party screen recorders for Mac. We listed some good options below.
OBS Studio
If you prefer a free screen recorder, try out OBS Studio. This open-source software is popular among online creators and streamers as it supports both screen recording and live streaming. The recording function also supports multiple sources, screen, system audio, webcam, and microphone.

OBS also has plugins you can use to access more features. Pretty cool, right? It works on Mac, Windows, and Linux. It has a steep learning curve that can be a problem for beginners.
💡 For the full guide on use screen recording feature of OBS, read this: OBS Screen Recorder: How to Record Your Screen Like a Pro
Camtasia by TechSmith
To create polished and professional-looking outputs, you can try Camtasia. This screen recording tool offers templates you can use to produce clips from YouTube, seminars, etc. The tool also has live annotation features and video editing tools.

Camtasia isn't free, but you can avail the free trial to test out the features. It's also a bulky tool that requires significant system resources.
💡 To know more about Camtasia, read this guide: TechSmith Camtasia – Best Screen Recorder to Capture Onscreen Activities with Ease
WidsMob Capture - Most Recommended
If you want an all-in-one screen recorder that’s both easy to use and powerful, then WidsMob Capture is your guy.

This tool supports HD to 4K recording and supports recording from multiple sources: screen, mic audio, system sound, window, and webcam. It also has a built-in screen recorder that lets you enhance the recorded clips by adding texts, trimming, cropping, and more!
This tool is also flexible in terms of audio and video formats as it supports formats like MP4, MOV, MKV, WMV, and more. WidsMob is also lightweight and has a user-friendly interface. Try it out now!
Final Thoughts
Thanks to Apple’s built-in tools, we can start screen recording with no hassle. But if you’re working on professional projects, try out the alternatives we listed. They offer more advanced features and produce better outputs.