


Focus Peaking – Definition and Quick Photography Tips to Be a Pro
Last Updated on June 9, 2026 by Rhea Cabalida
Manual focus gets frustrating when the subject is small, the light is weak, or the viewfinder makes sharp edges hard to read. Focus peaking solves that problem by marking the areas in focus, so the camera provides a fast visual cue instead of forcing a guess. Canon’s current manuals describe the feature as MF peaking or Outline Emphasis on supported EOS cameras.
The best way to use focus peaking is simple: turn it on, choose a clear color, adjust the level, and use magnified view when the shot needs precision. Canon’s manuals also show that peaking display and magnified view are separate tools, which is why magnification still matters for the final check.
In this Article:
- Part 1: What Is Focus Peaking in Photography
- Part 2: Which Camera Has Focus Peaking
- Part 3: Focus Peaking Can Trick You
- Part 4: Tips to Use Focus Peaking
- Part 5: When You Should Not Use Focus Peaking
- Part 6: Best Photo Viewer to Open RAW Photos
Part 1: What Is Focus Peaking in Photography
Focus peaking is a manual-focus aid that highlights the sharpest edges in the frame. The camera makes the in-focus area easier to see, which helps when manual focusing feels slow or uncertain. This feature is a way to display edges of subjects in focus in color, and Canon’s support pages let users adjust the outline color and sensitivity.
Focus peaking works best as a visual shortcut, not as a perfect replacement for careful focus. The display shows where the camera thinks focus is strongest, but a final check still matters when the depth of field is very shallow, or the subject must be exact. Canon’s documentation keeps peaking and magnifying the view separately for that reason.
Why Focus Peaking Helps
✅ It gives a fast focus cue without hunting through a soft image.
✅ It makes manual focusing easier to read in live view.
✅ It helps photographers work faster with supported Canon EOS bodies.
What Focus Peaking Does Not Do
✅ It does not replace autofocus.
✅ It does not guarantee perfect focus in every scene.
✅ It does not remove the need for magnification when precision matters.
Which Camera Has Focus Peaking
Many current cameras include focus peaking, but the menu names and controls are not the same across brands. Canon cameras use MF peaking or Outline Emphasis on supported EOS cameras, Sony uses Peaking Level and Peaking Color, Fujifilm uses FOCUS PEAK HIGHLIGHT, and Nikon cameras offer focus peaking with Peaking level and highlight color controls.
A better question than “Which brand has it?” is “How easy is the feature to read in real shooting?” Some cameras make peaking feel simple and clear, while others hide the option deeper in the menu or limit it to manual focus modes.
A Quick Brand Overview
| Brand | Menu Name | What the Camera Shows |
|---|---|---|
| Canon | MF Peaking / Outline Emphasis | Colored edges on supported EOS bodies. |
| Sony | Peaking Level / Peaking Color | Colored outlines in manual focus, with level and color controls. |
| Fujifilm | Focus Peak Highlight | High-contrast outlines that appear in manual focus mode. |
| Nikon | Focus Peaking / Peaking Level | Colored outlines that mark the in-focus area. |
A practical way to check camera support is simple. Open the manual, search for the peaking menu, and look for settings such as Color, Level, or Sensitivity. That tells you quickly whether the camera supports the feature in live view, manual focus, or both.
Focus Peaking Can Trick You
Focus peaking can be helpful, but it does not always mean the subject is perfectly sharp. The camera highlights contrast, not actual focus, so a textured wall, sharp leaves, or a busy background can light up even when the real focus is slightly off. Canon, Sony, Fujifilm, and Nikon all describe peaking as a focus aid, which is why a final check still matters.
That is why focus peaking works best as a first pass. It points you in the right direction, but a magnified view still gives the safer final check when the shot leaves little room for error.
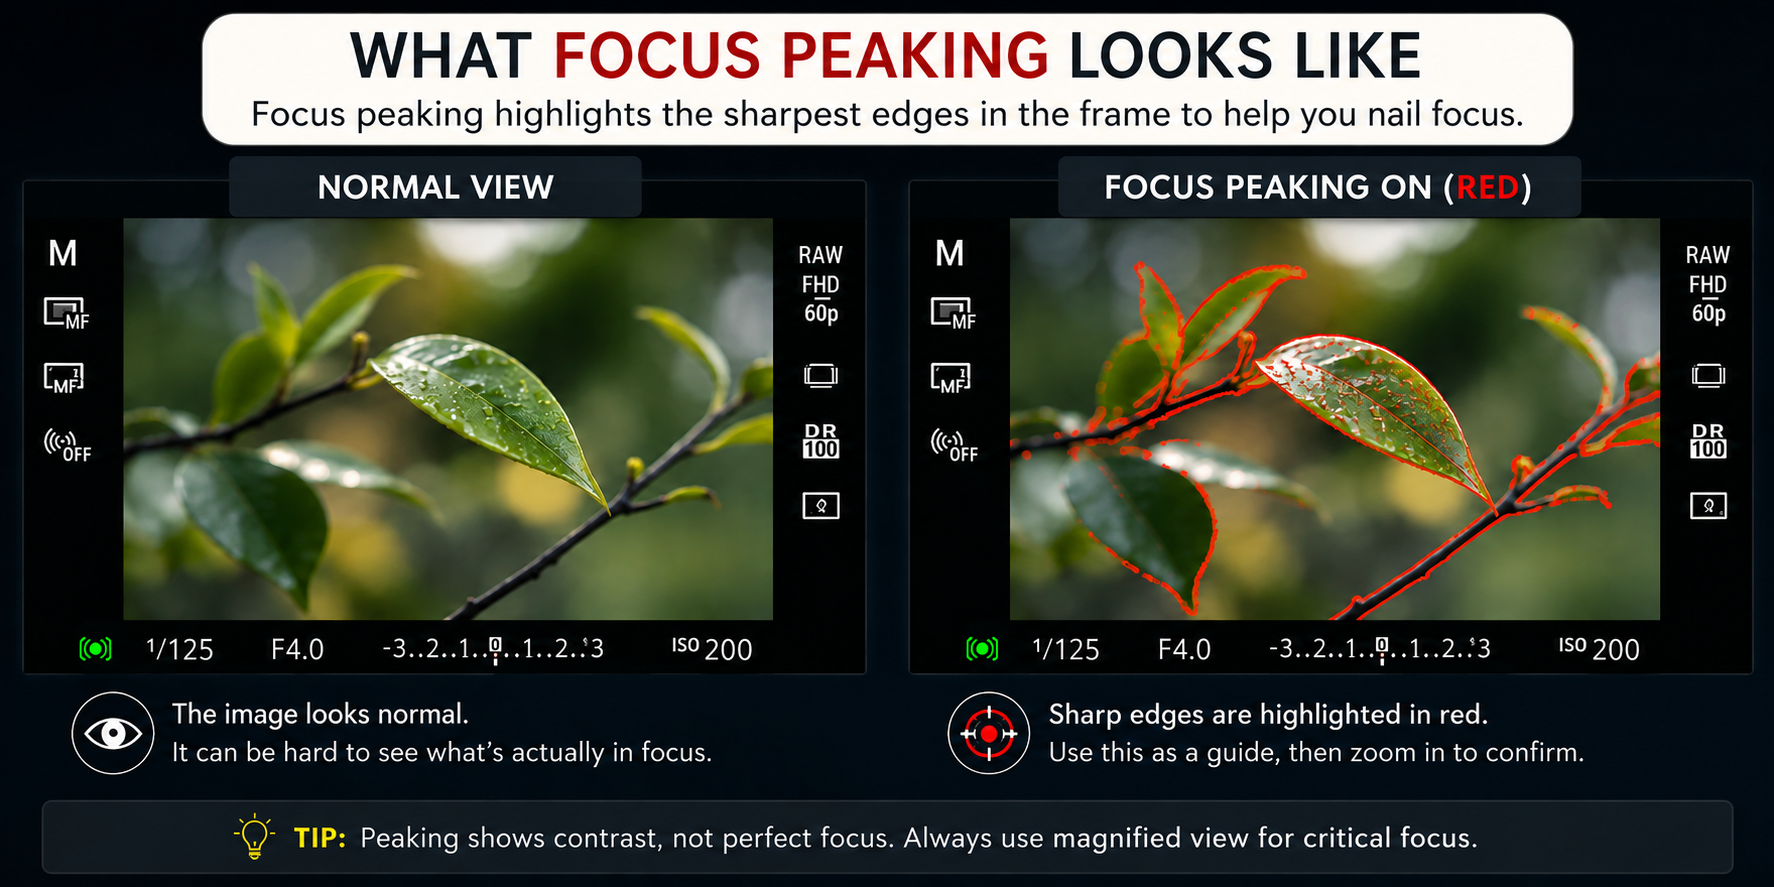
Focus peaking highlights the sharpest edges, not every detail in the frame.
Choose a Peaking Color that Stands Out
Pick a color that contrasts with the background and the subject. A strong outline is easier to read when the frame already contains a lot of similar tones. Canon’s manuals allow the outline color to be changed, so the display can match the scene instead of fighting it.
Adjust the Peaking Level
Use a lower peaking level when the frame is crowded or detailed. Use a higher level only when a stronger outline helps more than a subtle one. Canon’s support pages show that the Level setting exists because different scenes need different sensitivity.
Use Magnified View for the Final Check
Use a magnified view when the shot leaves little room for error. Canon’s documentation keeps peaking and magnified view as separate steps, and some Canon manuals note that peaking display is not shown in magnified view on supported bodies. That makes magnification the safer last step for critical focus.
A Simple Field Workflow
Step 1: Turn on focus peaking.
Step 2: Set a clear color.
Step 3: Adjust the level until the outline is easy to read.
Step 4: Use a magnified view before taking the final shot.
When You Should Not Use Focus Peaking
Focus peaking is helpful, but it can become misleading in scenes with a lot of texture, contrast, or very shallow depth of field. The camera may light up the wrong edge and make the frame look sharper than it really is, which is why a magnified view is still the safer choice for critical focus.
Use peaking for speed. Switch to magnification for certainty. Trust the final check when the shot matters most.
Best Photo Viewer to Open RAW Photos
After you use focus peaking to capture sharp images in the field, you still need a fast software pipeline that lets you confirm that sharpness on a monitor. That is where WidsMob Viewer Pro fits naturally, because the app is a fast media viewer, photo editor, and manager with folder-based browsing and one-window viewing.

The point is not that WidsMob Viewer Pro replaces the camera; it is a fast viewer that makes it easier to scan RAW files, compare the keepers, and move from shooting to review without slowing everything down.
How WidsMob Viewer Pro Compares with Other Tools
| Tool | Best use | Why it stands out |
|---|---|---|
| WidsMob Viewer Pro | Fast browsing and folder-based review | WidsMob highlights speed, one-window viewing, and folder-based browsing. |
| Adobe Bridge | Creative asset management | Adobe describes Bridge as a creative asset manager that lets users preview, organize, edit, and publish assets. |
| FastRawViewer | Technical RAW culling | FastRawViewer focuses on rating, labeling, sorting, and filtering RAW images. |
| Capture One | Full RAW editing and tethering | Capture One promotes advanced editing, RAW conversion, file management, and industry-leading tethering. |
| Apple Photos | Casual library management | Apple positions Photos for editing, organizing, sharing, and iCloud sync across devices. |
Final Thoughts
Focus peaking is one of the simplest ways to speed up manual focus without guessing. Canon’s current manuals show how MF peaking works on supported EOS bodies, and WidsMob Viewer Pro fits naturally into the workflow after the shoot as a fast RAW viewer for quick review.
The best results come from using the right tool at the right stage. Peaking helps you capture the shot, magnification helps you confirm it, and a fast viewer helps you sort the keepers without slowing down the rest of the workflow.