


How to Process GoPro Photos: Transfer, Edit, and Organize Like a Pro
Last Updated on June 30, 2026 by Peter Wood
GoPro cameras excel at capturing fast-moving action, scenic landscapes, and travel adventures, but the work doesn't end when you press the shutter. After years of shooting action sports and travel landscape photography on various Hero models, I’ve found that many users lose time, or even image quality, because they transfer files inefficiently, edit the wrong photos first, or rely on outdated workflows.
A better approach is to treat post-processing as a simple, organized workflow. Import your photos without compression, review the files before editing, make only the adjustments that matter, and keep the original images backed up. That process is faster, preserves more detail, and makes it easier to find your best shots later.
This guide explains how to process GoPro photos from start to finish. You'll learn how GoPro photo formats differ, the best ways to transfer images to an iPhone, iPad, or computer, how to correct common image problems, and which tools work best for editing and organizing your library.

In this Article:
- Understand GoPro Photo Formats Before Editing
- Reduce Editing by Choosing the Right Lens Mode
- Review Your Photos Before Editing
- Transfer GoPro Photos Without Losing Quality
- Optimize GoPro Photos After Importing
- Choose the Right Tool for Each Task
- View and Organize GoPro Photos
- Build a Consistent GoPro Workflow

WidsMob Viewer Pro
WidsMob Media Viewer - View single image, multiple images, folder-based images, and videos in incredible fast speed and simple operation with various viewing modes. You can browse all your photos (including RAW files) and videos in one window without extra clicking and operating.
Understand GoPro Photo Formats Before Editing
Choosing the right GoPro photo format affects image quality, editing flexibility, and storage requirements. Understanding the differences between JPEG, RAW, HDR, and Burst photos helps you decide which files need editing and which are ready to share immediately.
Before opening an editor, take a few minutes to review the photos you've imported. Removing duplicates, accidental shots, or blurry images first keeps the editing process focused and saves time, especially after a long trip.
JPEG vs. RAW (.GPR)
Most GoPro cameras save photos as JPEG, RAW (.GPR), or both, depending on the shooting mode. While both formats capture the same scene, they serve different purposes after the photos leave the camera.
| Format | Best For | Advantages | Limitations |
|---|---|---|---|
| JPEG | General photography and sharing | Small file size, processed in-camera, ready to use | Less flexibility for recovering highlights, shadows, and color |
| RAW (.GPR) | Detailed editing | Retains more image data for exposure and color adjustments | Larger files that require compatible editing software |
A JPEG file is processed by the camera before it is saved. Color, sharpening, contrast, and noise reduction are already applied, making the image suitable for quick sharing or printing.
A RAW file is different. Instead of producing a finished image, the camera records much more of the information captured by the sensor. The photo may initially look flatter than a JPEG, but that extra data gives you greater control when adjusting exposure, white balance, highlights, and shadows later.
If you're photographing important moments, landscapes, or scenes with difficult lighting, shooting in RAW is usually worthwhile. For casual snapshots that won't need extensive editing, JPEG is often the more practical choice.
HDR and Burst Photos
HDR and Burst modes solve different shooting challenges. HDR improves photos with bright highlights and dark shadows, while Burst captures multiple frames in quick succession to increase the chance of getting a sharp action shot.
HDR (High Dynamic Range) combines information from multiple exposures to preserve more detail across the image. It works well for scenes such as sunsets, mountain views, or city skylines where the sky is much brighter than the foreground.
Burst mode records several photos almost instantly after you press the shutter button. It is especially useful for activities such as surfing, mountain biking, skiing, or wildlife photography because you can choose the sharpest frame afterward.
Keep in mind that Burst mode can fill a memory card quickly. After importing the photos, review the sequence and delete unnecessary duplicates to free up storage.
Reduce Editing by Choosing the Right Lens Mode
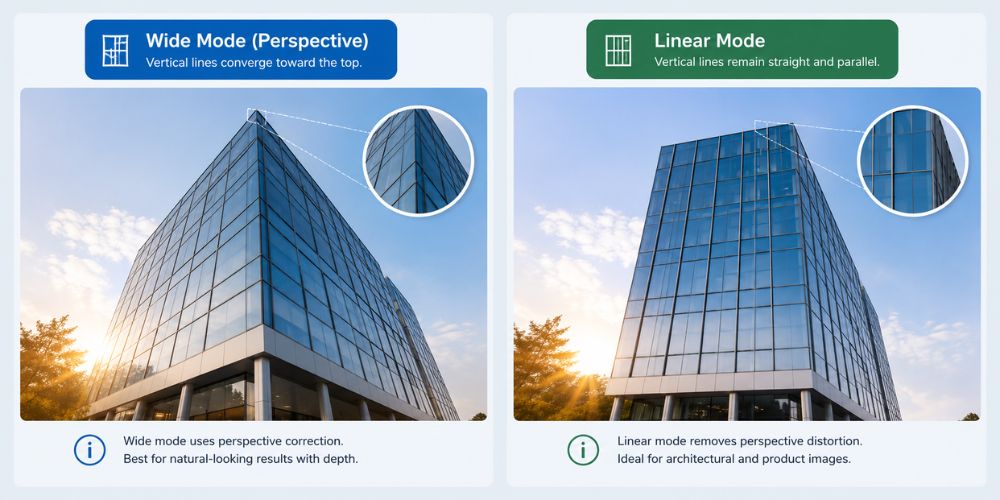
Many fisheye problems can be prevented while shooting instead of being corrected later. Selecting the appropriate digital lens mode often reduces the amount of editing required after you import your photos.
GoPro cameras offer several digital lens options, including Wide, Linear, and other modes depending on the camera model.
In general:
- Wide captures the largest field of view but produces the strongest perspective distortion.
- Linear keeps straight lines looking more natural, making it a better choice for architecture, landscapes, and everyday photography.
- Wider lens modes remain useful for action sports when capturing as much of the scene as possible is more important than perfectly straight edges.
Choosing the appropriate lens mode before taking the photo is often more effective than relying on software to correct distortion afterward.
Review Your Photos Before Editing
Sorting your photos before making adjustments helps you spend time on the images that matter most. Reviewing the entire folder first also prevents unnecessary edits on photos you'll eventually delete.
A simple review process works well for most GoPro libraries:
- Delete accidental or blurry photos.
- Group similar shots together.
- Mark your favorite images.
- Keep the original files as a backup before editing.
- Edit only the photos worth keeping.
Think of this step as narrowing down your best images before investing time in detailed edits. Whether you captured 50 photos or 500, a few minutes of organization can make the rest of the workflow much more efficient.
Transfer GoPro Photos Without Losing Quality
The best way to transfer GoPro photos is to copy the original files directly from the camera or memory card. Choosing the right transfer method helps preserve image quality, retain metadata, and save time, especially when importing large photo libraries.
There is no single method that works best for everyone. If you regularly transfer a few photos to your iPhone, a wireless connection is convenient. If you return from a trip with hundreds of photos and RAW files, using an SD card reader or USB connection is usually much faster.
Transfer Photos With GoPro Quik
GoPro Quik is the official companion app for GoPro cameras. It provides one of the simplest ways to transfer photos wirelessly to an iPhone or iPad while also giving you access to basic editing and media management tools.
After pairing the camera with your mobile device:
- Connect the camera through GoPro Quik.
- Browse the available photos.
- Import the images you want to keep on your device.
- Organize or make quick adjustments if needed.
Wireless transfers are convenient for everyday use, but they generally take longer than copying files directly from the memory card. In my own tests, transferring a batch of 50 RAW images via the Quik app took nearly three minutes and drained the camera battery significantly, which is why I prefer physical connections for large sets.
Transfer Photos With an SD Card Reader
An SD card reader is usually the fastest and most reliable option for importing large photo libraries. It copies the original files directly from the memory card without relying on a wireless connection.
This method is well suited for photographers who regularly shoot in RAW or capture long Burst sequences.
Advantages include:
- Faster transfer speeds than wireless imports
- Original file quality is preserved
- EXIF metadata remains intact
- Works well for large batches of photos and videos
After inserting the SD card into your computer or compatible mobile device, simply copy the files to your preferred folder before opening them in your photo management or editing software.
Transfer Photos With a USB Cable
Connecting the camera directly to a computer is another dependable option when an SD card reader is unavailable. The transfer process is straightforward and keeps the original files unchanged.
To import photos:
- Connect the GoPro camera with a USB cable.
- Open File Explorer on Windows or Finder on macOS.
- Locate the camera or storage device.
- Copy the photo folder to your computer.
Once the files are stored locally, you can import them into Apple Photos, move them to an iPhone with AirDrop, or back them up using your preferred cloud storage service. Always make sure your camera is powered on and set to MTP mode in the connections menu so your computer can recognize the file structure correctly.
Which Transfer Method Should You Choose?
Each transfer method offers a different balance of speed and convenience.
| Method | Speed | Best For |
|---|---|---|
| SD Card Reader | Fastest | Large photo libraries, RAW files, and regular backups |
| USB Connection | Fast | Direct transfers to a Windows PC or Mac |
| GoPro Quik | Moderate | Wireless imports to an iPhone or iPad |
| AirDrop | Fast | Moving photos from a Mac to an iPhone or iPad |
If your priority is preserving the original files while saving time, an SD card reader remains the most efficient choice. For quick mobile imports during travel, GoPro Quik offers the most convenient workflow.
Optimize GoPro Photos After Importing
Most GoPro photos only require a few careful adjustments to improve exposure, color, sharpness, or lens distortion. Starting with small corrections usually produces more natural results than applying heavy edits to every image.
Before making any adjustments, compare similar photos from the same scene. You may find that only a handful of images need editing, while the rest are already suitable for sharing or printing.
Correct Wide-Angle Distortion
Wide-angle distortion is a normal characteristic of GoPro cameras, especially when using wider digital lens modes. Software can reduce the effect, but choosing the right lens mode during capture is often the better solution.
If a photo contains curved horizons or bent buildings, most modern photo editors include lens correction tools.
In Adobe Lightroom, the basic process is:
- Import the photo. Open the Develop module.
- Expand the Lens Corrections panel.

- Enable profile corrections if a suitable profile is available.
- Fine-tune distortion manually when necessary.
Some GoPro shooting modes already apply distortion correction in-camera, so the amount of adjustment needed varies depending on the camera model and lens setting used during capture.
Improve Exposure and Color
Exposure and color adjustments usually have the greatest impact on overall image quality. Small changes often produce a cleaner, more natural-looking photo than aggressive editing.
When editing a photo, focus on these adjustments first:
- Exposure
- White balance
- Highlights
- Shadows
- Contrast
- Vibrance or saturation
If you're working with a RAW (.GPR) file, you can generally recover more highlight and shadow detail than you could from a JPEG image. In my experience editing backlit trail shots, pulling down the highlights slightly in a RAW editor brings back deep blue sky details that look completely blown out in a standard JPEG.
Reduce Noise in Low-Light Photos
Photos captured at night or in dim environments often contain visible digital noise. Applying moderate noise reduction while preserving fine details produces the best balance between sharpness and image quality.
To improve low-light photos:
- Apply noise reduction gradually.
- Recover shadow detail carefully.
- Avoid excessive sharpening.
- Increase brightness in small adjustments rather than one large correction.
Many current photo editors include improved noise reduction tools that preserve detail more effectively than older algorithms, making low-light GoPro photos easier to refine than in previous years.
Choose the Right Tool for Each Task
No single application handles importing, editing, organizing, and viewing GoPro photos equally well. Choosing software based on the task instead of relying on one program creates a faster workflow and often produces better results.
Most users only need one or two applications. If you mainly share photos on social media, a simple editor may be enough. If you frequently work with RAW files or large photo libraries, dedicated software can save time during both editing and organization.
| Task | Recommended Tool | Why It Fits the Job |
|---|---|---|
| Wireless photo transfer and quick mobile edits | GoPro Quik | Official GoPro app with wireless import, basic editing, and camera management |
| Edit RAW (.GPR) photos | Adobe Lightroom | Extensive controls for exposure, color, lens correction, and local adjustments |
| Edit photos without a subscription | GIMP | Free image editor with advanced editing features |
| Correct lens distortion and optical issues | DxO PhotoLab | Known for high-quality lens profiles and noise reduction |
| Browse and organize large photo libraries | WidsMob Viewer Pro | Displays photos, RAW files, and videos without requiring file conversion |
The best software depends on your workflow rather than your camera. For example, GoPro Quik works well for quick imports and simple edits, while Adobe Lightroom offers much greater control when processing RAW images.
WidsMob Viewer Pro
WidsMob Media Viewer - View single image, multiple images, folder-based images, and videos in incredible fast speed and simple operation with various viewing modes. You can browse all your photos (including RAW files) and videos in one window without extra clicking and operating.
View and Organize GoPro Photos
Reviewing and organizing your photos before editing helps you find the strongest images faster. A dedicated media viewer can also make browsing large folders easier than opening every file inside a photo editor.
After a vacation or outdoor adventure, it's common to return with hundreds of photos and videos. Spending a few minutes organizing those files first can significantly reduce the time spent editing later.
A practical way to organize your library is to:
- Create folders by trip or event.
- Delete accidental or duplicate photos.
- Separate edited images from the originals.
- Keep RAW files if you plan to revisit your edits later.
If your collection contains a mix of GoPro photos, RAW images, and videos, a dedicated media viewer can simplify the review process. WidsMob Viewer Pro is one example that supports folder-based browsing, allowing you to preview different file types without converting them first.

Build a Consistent GoPro Workflow
A consistent workflow helps protect your original files, reduces repetitive work, and makes future editing sessions much easier. Small organizational habits often save more time than learning new editing techniques.
Rather than editing photos immediately after importing them, work through each stage in order. This approach keeps your files organized and reduces the chance of accidentally overwriting or deleting important images.
A simple workflow looks like this:
- Import the original files from the camera or SD card.
- Review the entire photo library and remove unusable shots.
- Organize the remaining photos into folders or albums.
- Edit only the images worth keeping.
- Export finished photos in the format and resolution you need.
- Archive the original files as a backup.
Keeping the original files is especially important when working with RAW images. If your editing style changes or new software becomes available, you'll always have the untouched files available for future edits.
This workflow also makes it easier to locate photos months or even years later. Whether you shoot occasionally or travel with a GoPro throughout the year, spending a little extra time organizing your library pays off in the long run.
To minimize unexpected transfer issues, make it a habit to check for and install camera firmware updates via the Quik app before heading out into the field.
Frequently Asked Questions
Conclusion
Processing GoPro photos is about more than improving colors or correcting distortion. A good workflow starts with preserving the original files, continues with careful organization, and finishes with editing only the photos that need adjustments.
For most users, an SD card reader or GoPro Quik provides an efficient way to import photos without reducing quality. From there, choose software based on the task at hand, whether that's detailed RAW editing in Adobe Lightroom, free image editing in GIMP, or reviewing large photo libraries before editing.
Taking a few extra minutes to organize your files before making adjustments can save considerable time later. More importantly, it helps ensure your best GoPro photos remain easy to find, easy to edit, and safely backed up for years to come.